 |
| Image by Adina Voicu of Romania. Source: https://goo.gl/CNpZNx License: CC0 Public Domain |
Update on 4th August 2015
I've converted this super-long post into a PDF file. You can also go to the bottom of this post for a Scribd embed version of this post.
How would you like to be able to launch into a Wordpress blog directly from within your Moodle production site? At the end of this post, you will know how to enable a Single Sign-On between your Moodle 2.9 site and your Wordpress multisite in a LAMPP environment. To put it simply, within Moodle itself, you will be able to launch into Wordpress directly using the same Moodle login details. For example, here I am at my Moodle 2.9 test page, before clicking on the External Tool activity:
After clicking "Da Store" activity, I am transported into my WordPress page. The Wordpress site can open up either as an embed or as a separate window.
Notice the same login details above? The Single-Sign On (SSO) is part of a bigger picture called LTI (Learning Tools Interoperability). For a layman's explanation, head over to Quora. Gavin Hendrick has some super organised thoughts on LTI in his blog post.
In this post, I am going to show all the steps needed to do this.
The 10 steps are divided into 3 phases:
Section I: Newbies section (skip this and go Click here if you already know this)
1. Create a MySQL database
2. Create a MySQL user to link to the database
3. Download and install Wordpress
Section II: Multisite Wordpress Section
4. Setup Wordpress as a multisite
Section III: The LTI Connector Section
5. Download and install SPV's LTI Connector for WordPress
6. Modify wp-config.php for WordPress to allow Tool Consumers to be saved
7. Add a Tool Consumer record
Section IV: The Moodle Section
8. Creating a Moodle LTI external tool type
9. Adding an LTI external tool on your Moodle coursepage
10. Testing the fruit of your labours - it works!
And off we go!
Section I: Newbies section (skip this and go here if you already know this)
1. Create a MySQL database
Log into your CPanel.
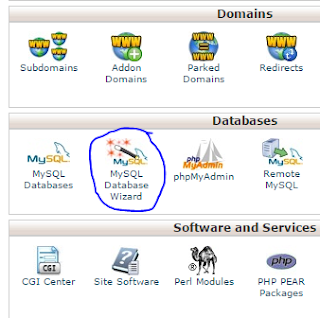
In your CPanel, click on "MySQL Database Wizard" icon.
2. Create a MySQL user to link to the database
At the user's privileges window, tick the "ALL PRIVILEGES" checkbox. Click "Next Step" button.
If all went well, you should see a 'success' window. This concludes Part 1.
3. Download and install Wordpress
Surf over to https://wordpress.org/download/
If you are using a Windows server, click the download Wordpress 4.2.2 button. If that button now reads as 5.x.x, then you will know how outdated this post is, LOL! If you are using a LAMPP (Linux) system, click the https://wordpress.org/latest.tar.gz
Go back to your CPanel.
Click the File Manager icon.
Go to the Web Root by checking the option. Click Go.
Create a new folder by clicking the "New Folder" icon.
Type the text "blogwp" as the folder name and click the "Create New Folder" button.
Refresh your screen (usually F5). You should see the new blogwp folder in the list.
Double-click your mouse on the blogwp folder. The directory is empty. You are now ready to upload the Wordpress compressed file either by FTP or by the CPanel's File Manager.
Extract the file's contents. A new subfolder named Wordpress will be created,
Click the Close button. Next make sure you move the contents of /public_html/blogwp/wordpress into /public_html/blogwp:
You can then delete the (by then) empty wordpress subfolder. Your /public_html/blogwp folder should look like this:
Go to your webbrowser and type http://www.yourdomain.com/blogwp
Choose your language (English (United States) is the default) and click the "Continue" button.
Click the "Let's go!" button.
You will see the above window. Remember the database name, username and username's password that you had created earlier? Now's the time to enter them into the edit boxes.
Click the Submit button. If the details were entered correctly, you will be prompted with the following screen:
Click the "Run the install" button. The "Information needed" window will appear. Type in your blog's title and the administrator user's login details. For example:
Important! Use DIFFERENT sets of admin username and password for your Moodle admin account and your Wordpress admin account. Please choose separate admin usernames and separate passwords to avoid any complications during the sign-on from Moodle to Wordpress.
Click the "Install Wordpress" button to initiate the installation of Wordpress. If successful, you should see the following window:
Click the "Login" button to test your blog site.
Enter your Username and Password. Click the "Log in" button.
If your Wordpress 4.2.2 site has been successfully setup, you should see this screen:
Congratulations! You are now ready to go to Steps 4 through to 9. Stay logged into your Wordpress site. Do not log out yet.
Section II: Multisite Wordpress Section
4. Setup Wordpress as a multisite
FTP into your /public_html/blogwp folder. Right-click the file named "wp-config.php" file. Choose "View/Edit" from the shortcut list. This section assumes that you have a decent text-processor to edit the php source code.
Go to line 88 of the file. You should see this code:
Add the line of code at line 86:
define('WP_ALLOW_MULTISITE', true); so that the code now looks like this:
Save the 'wp-config.php' file.
If you check your Wordpress left menu, you should see options available under "Tools".
Refresh your web browser. If you check your Wordpress left menu, you should see an additional option named 'Network Setup' available under "Tools":
Click the Network Setup link. You should now see this screen:
Click the Install button. The following screen will appear.
In the file named /public_html/blogwp/wp-config.php, add the code:
define('MULTISITE', true);
define('SUBDOMAIN_INSTALL', false);
define('DOMAIN_CURRENT_SITE', 'www.cambridgekids.org'); <== Careful!!
define('PATH_CURRENT_SITE', '/blogwp/'); <== Careful!!
define('SITE_ID_CURRENT_SITE', 1);
define('BLOG_ID_CURRENT_SITE', 1);
just above the code that says /* That's all, stop editing! Happy blogging. */
so that the code now looks like this:
Be careful to replace the highlighted code with your own domain name and folder name.
Edit the file named /public_html/blogwp/.htaccess and replace the highlighted section
with this code:
RewriteEngine On
RewriteBase /blogwp/ <== Careful!!
RewriteRule ^index\.php$ - [L]
# add a trailing slash to /wp-admin
RewriteRule ^([_0-9a-zA-Z-]+/)?wp-admin$ $1wp-admin/ [R=301,L]
RewriteCond %{REQUEST_FILENAME} -f [OR]
RewriteCond %{REQUEST_FILENAME} -d
RewriteRule ^ - [L]
RewriteRule ^([_0-9a-zA-Z-]+/)?(wp-(content|admin|includes).*) $2 [L]
RewriteRule ^([_0-9a-zA-Z-]+/)?(.*\.php)$ $2 [L]
RewriteRule . index.php [L]
Again, be careful to replace the above yellow highlighted code with your own folder name.
So your .htaccess file should now look like this:
Save both wp-config.php and .htaccess files. Log out of Wordpress. Log in again.
This time the home screen looks different:
In addition, if you hover your mouse cursor over "My Sites" you will see a new option "Network Admin" with its own set of options (Dashboard, Sites, Users,...etc.).
Create a writable subfolder named blogs.dir and place it inside /public_html/blogwp/wp-content:
Section III: The LTI Connector Section
5. Download and install SPV's LTI Connector for WordPress
Surf here and download the file wordpress-lti-1.1.00.zip which is found inside the "Files Tab".
Extract the zip file to your harddrive. The contents of the zip file look like this:
Upload the subfolder lti into the plugins directory of the WordPress instance. I.e., into /public_html/blogwp/wp-content/plugins
Your plugins folder should now look like this:
Log out of WordPress. Re-login as the administrator;
Navigate to the Network Admin | Plugins.
Click on Plugins and you will see this:
Check the LTI tickbox and then click LTI's "Network Activate" link to activate the plugin.
The LTI plugin is now activated and ready to be used.
Once enabled, the module will automatically create a set of tables in the WordPress database and a new menu option named "LTI Tool Consumers" will appear on the dashboard menu.
If you need to completely remove the LTI plugin from your WordPress installation, delete the public_html/blogwp/wp-content/plugins/lti subfolder and use phpMyAdmin to remove the database tables using the following SQL:
DROP TABLE wp_lti_user;
DROP TABLE wp_lti_nonce;
DROP TABLE wp_lti_share_key;
DROP TABLE wp_lti_context;
DROP TABLE wp_lti_consumer;
6. Modify wp-config.php for WordPress to allow Tool Consumers to be saved
If you have access to the server you can force WordPress 4.4.2 to use MySQLi as the connector by adding (assuming you have the MySQLi connector) into /public_html/blogwp/wp-config.php this code:
define('WP_USE_EXT_MYSQL', false);
Here's what that 'defines' part of /public_html/blogwp/wp-config.php looks like, after the addition:
Save the /public_html/blogwp/wp-config.php file.
Log out of Wordpress. Re-login as the administrator.
A note from Simon Booth's site:
If you have to stick with the MySQL connector then a quick cheat will fix things. Edit the file /public_html/blogwp/wp-content/plugins/lti/lib/LTI_Data_Connector_mysql.php
and make
line 35: global $wpdb;
line 51: $this->dbTableNamePrefix = $wpdb->prefix;
7. Add a Tool Consumer record
Navigate to My Sites | Network Admin | Dashboard
Click the "Dashboard link". You will now see the
Navigate to LTI Tool Consumers | LTI Tool Consumers.
Click the "LTI Tool Consumers" link. You will see an empty list of Tool consumers. To add a Tool Consumer, click the "Add New" button.
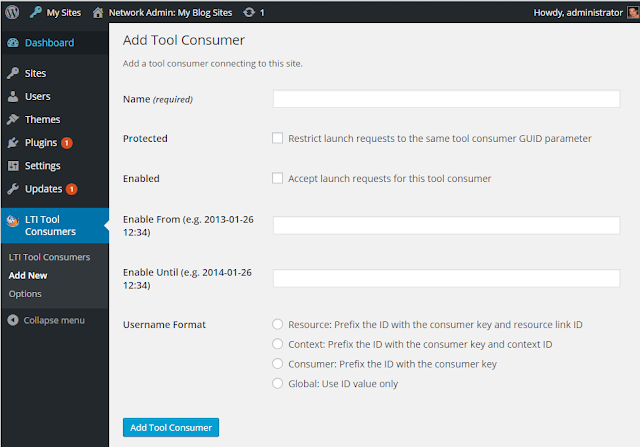
You will see this screen:
Type in "blogs" as the Name. Tick the "Accept launch requests for this tool consumer" check box. Tick the "Resource: Prefix the ID with the consumer key and resource link ID" radio button.
Click the "Add Tool Consumer" button to save the tool entry. Wordpress will display the Launch URL, the (Consumer's) Key and the Secret (Key) codes. You should copy and paste these values into a text editor like Notepad.
Clicking again on the LTI Tool Consumers link will give you the list of Tool Consumers created so far:
You can now log out of Wordpress.
Section IV: The Moodle Section
8. Creating a Moodle LTI external tool type
Log into your Moodle site with your Moodle admin account details. Navigate to "Site administration | Plugins | Activity modules | LTI | Manage external tool types".
You will come across "Manage external tool types" screen:
Tool name: blog
Tool base URL: http://www.yourdomain.com/blogwp/?lti
 |
| Here's the sample codes taken from Section III. |
Consumer key: the "Key:"
Shared secret the "Secret"
Tick the "Show tool type when creating tool instances" check box
Choose a Default launch consumer, e.g., "Embed, without blocks".
As shown below:
Under the Privacy section, set "Accept grades from the tool" to Never.
Click the "Save changes" button. You will see you entry saved and appear as below:
9. Adding an LTI external tool on your Moodle coursepage
Go to a course on your Moodle site. Add an External Tool activity on the course page.
You will see this appear:
Type an Activity name. For example, My blog.
Click the "External tool type" dropdown list and choose blog.
Click the "Save and return to course" button. You will see your External Tool activity on your course page.
10. Testing the fruit of your labours - it works!
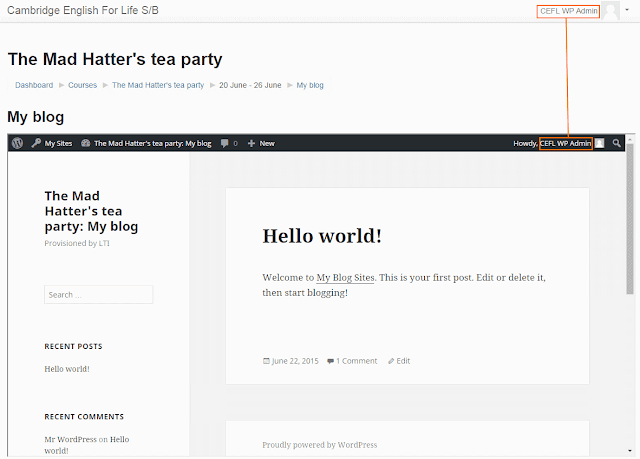
Log out of Wordpress. Click on the activity "My blog". You will see the Wordpress homepage embedded in the course page. Note that the user is logged into Wordpress as "CEFL WP Admin".
In this example, I am logged in as CEFL WP Admin in both Moodle and Wordpress. Success!
Log out. Log in as another Moodle user. Preferably as a student user.
Navigate to the External Tool activity on the course page.
Click on the activity "My blog".
In this example, I am logged in as Alex The Lion in both Moodle and Wordpress. Success!
In conclusion, the SSO between Moodle and Wordpress works. I hope this is useful for you and that you have saved a lot of hours by reading this post. If you are also have managed to successfully use Simon Booth's LTI Connector plugin for your own production or test site, please drop in a comment. I would love to hear from you.
Cheers
Frankie Kam, Malaysia
APPENDIX
Some afterthoughts. Still can't work?
(1) Did you replace the your own correct domain name and folder name inside wp-config.php?
(2) Did you replace the your own correct folder name inside .htaccess?
(3) Make sure that your Wordpress admin account's username and password are different from your
Moodle site's admin account.
(4) Double check the contents of .htaccess and wp-config.php.
(5) Perhaps you didn't upload the lti folder into the plugins folder of Wordpress.
(6) Maybe you don't have mod_rewrite enabled on your Apache web server. Read here.
(7) The LTI Consumer Tool doesn't save the record to the list after clicking "Add New"? Read here.
(8) Send me an E-mail: boonsengkam at gmail dot com.
Useful References:
Using WordPress Multisite: A Network of Websites at Your Fingertips
http://code.tutsplus.com/articles/using-wordpress-multisite-a-network-of-websites-at-your-fingertips--wp-23978
LTI Connector for WordPress Homepage
http://www.spvsoftwareproducts.com/php/wordpress-lti/
Projects Oscelot Org's plugin page
http://projects.oscelot.org/gf/project/wordpress-lti/frs/?action=FrsReleaseView&release_id=918
Direct download of LTI plugin used in this post
http://projects.oscelot.org/gf/download/frsrelease/918/5837/wordpress-lti-1.1.00.zip
Solving the "No Tool Consumers Saved When Added" problem
http://projects.oscelot.org/gf/project/wordpress-lti/forum/?action=ForumBrowse&_forum_action=MessageReply&message_id=1761
Review: LTI Provider for Moodle 2.2
http://www.somerandomthoughts.com/blog/2012/01/08/review-lti-provider-for-moodle-2-2/
My outdated blog 2013 post on the same subject
http://moodurian.blogspot.com/2013/07/integrating-moodle-and-wordpress.html
Useful Terminology (Source: LTI Best Practice Guide)
The LTI specification uses the following terms:
tool consumer - typically this refers to the VLE; it is the system which users are logged into
and from which they will be redirected to the external applications being integrated with it;
tool provider - this is the web-based learning application or content delivery system which is
being integrated with the tool consumer;
consumer key - this string value is generated by the tool provider to allow them to uniquely
identify the source of requests being received;
shared secret - the communications between the tool provider and the tool consumer are
secured using a signature generated using the OAuth 1.0 protocol [OAuth-A] with the shared
secret (which should be known only to the tool provider and the tool consumer);
context - tool consumers are typically organised into courses, with users being enrolled into
each course for which they are permitted to access; thus, in this case, the course is the
context from which users launch into tool providers;
resource link - this is the actual link provided within a context which users follow to access
the tool provider; there may be multiple resource links to each tool provider within the same
context and across the whole tool consumer but each resource link is uniquely identified.
Last updated by
Frankie Kam on 4th August 2015
Tested on Moodle
2.9 and Wordpress 4.2.2 and 4.2.3


No comments:
Post a Comment