Pages

Wednesday, March 8, 2017

HOW I USED PCem TO CREATE A VIRTUAL 486 PC. Now I can enjoy playing Tornado on it!


Tags: virtualisation, PC emulation, reviving them olde dead games, PCem, DOSBox, Tornado flight sim, high fidelity sound, pure Voodoo graphics, leave your dusty outdated PC in the attic, maximum coolness, extreme awesomeness


EXECUTIVE SUMMARY
I don't have my own 486 PC. The last time I used one was in 2002. I couldn't play lots of old games on my modern PC. So I created a virtual 486 PC on my 64-bit Windows 10 Dell laptop. Now I can play any old DOS or Windows95/98 game on my Intel i5-4210U, 1.7Ghz, 8Gb RAM Dell laptop.


Here's the thing. You've got lots of CDs of old games, but you can't play them because they can't and won't run on your modern machine. Short of downloading the revived versions from Steam or GOG.com (that's is if they are there!), there is another way. PCem.

Today I figured out how to use PCem to play the old DOS and Windows flight simulators in their native environment. Woo hoo!

I'm talking high-fidelity Soundblaster sounds and music, accurate CPU cycles as per the actual PC BIOS and motherboards. I'm talking about Voodoo1 and Voodoo2 3Dfx rendering of graphics (better than what any 3Dfx software Glide Wrapper can do). In short, I can create my own virtual 486 machine with all the trimmings (devices and drivers) so that I can play classic DOS and Windows games with the authentic 1990s aural and visual experience!

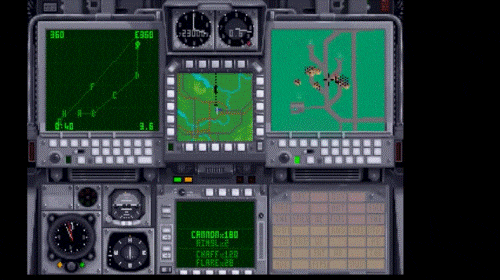
PCem is a PC emulator that's been around for some time. After lots of poking around, I managed to setup up virtual machine (emulator) running on MS-DOS 6.22 bootable disk and Windows 95. The MS-DOS bootable disk is for playing DOS games - especially Tornado which needs at least 605 kilobytes of free conventional RAM. The Windows 95 mode is for running Mig Alley and other dinosaur Windows flight simulators that modern computers abhor.

Using PCem, I emulated a 486DX/2 40Mhz machine. That was expensive state of the art back in the early 1990s.

Here are some screenshots of my efforts. PCem running on my Windows 10 laptop!


Windows 95 running in all its glory on my desktop. To run in MS-DOS 6.22,
I have to attach the MS-DOS 6.22 boot disk image file, just before Win95 kicks in.


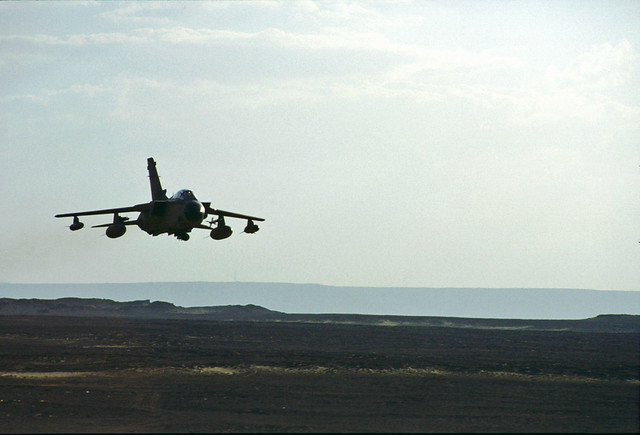
Tornado running merrily along. An external view.

For more of this madness, read more here.

Cheers
Frankie Kam

Sunday, January 8, 2017

Creating Cinemagraphs using Microsoft Blink Cliplets -

Welcome to my first post of 2017.

Cinemagraphs are basically animated gifs created using Videos. Cinemagraphs are still photographs in which a minor and repeated movement occurs, forming a video clip. They are published as an animated GIF or in other video formats, and can give the illusion that the viewer is watching an animation.

Here are some Cinemagraph GIF files that I have created.

Screenshot 1. A discussion - 194 Kb GIF file

Screenshot 2. Digital Integration's Tornado - WSO station (225 Kb GIF file)

Screenshot 3. Digital Integration's Tornado - WSO station again (223 Kb GIF file)

A Cinemagraph makes the GIF file come alive! You can select just a small portion to animate whilt the rest of the screen is static. As in the Screenshot 1. 

Here's the best part of a Cinemagraph. It's file size is smaller compared to an animated GIF of the same content. Look at Screenshot 3. An animated GIF of the same countent would be at least 2 Megabytes in size. The Cinemagraph is a 10 times smaller than the animated GIF. Using a Cinemagraph on a web page would lead to faster load times of a webpage, compared to a bloated animated GIF. 

Here is the link to download the Cinemagraph program (free by Microsoft)

Here is the link to other examples of cinemagraphs
http://www.hongkiat.com/blog/cinemagraph/

Cheers
Frankie Kam

Sunday, November 20, 2016

Play Digital Integration's Tornado on your iPad Air (and any DOS game, for that matter) and on any iOS device

Source: Nobbby. Pixabay CC0 Public Domain
https://pixabay.com/en/ipad-apple-silver-tablet-touch-1177347/

I just discovered how to play Digital Integration's venerable 23-year old DOS game Tornado on my iPad Air. I used iDOS 2 and the iExplore app. Check out these screenshots. The game runs well on my 2014 iPad Air. And it will also work on your beloved iPhone. Well, any device running iOS.

Screenshot 1: iDOS 2 when my iPad is held in portrait orientation

Screenshot 2: iDOS 2 when my iPad is held in landscape orientation
The problem here is no matter what opacity setting you choose for the virtual keyboard,
you can hardly make out the game's cockpit graphics because of the way the virtual
keyboard is overlaid on top of the game.

Wednesday, September 28, 2016

Make a Play Once Only question in a Moodle quiz with Justin Hunt's PoodLL Repositories plugin

Image credit: Username Coffee.
https://pixabay.com/en/microphone-stage-sound-1222302/
I am using Moodle 2.7.2 for one of my quizzes. I also use Justin Hunt's excellent PoodLL repositories to make "Play (Listen) Once Only" recordings that I include inside my Moodle quiz.  

The repository has a play-once audio player that looks like this: 

If you ever wanted to make listening-type Moodle quiz questions, then read on!

Friday, September 16, 2016

Easily enroll multiple students on WordPress into your purchased Moodle course with the Edwiser Bridge-Bulk Purchase extension

Bulk Purchase. Credit: Alexas_Photos.
Source: http://goo.gl/0T7ajs
Welcome to my fifth and last post in a series of five posts featuring the Edwiser Bridge and its four extensions. Today I will focus on the Edwiser Bulk Purchase Extension, which is a commercial plugin. The best thing about this plugin is that you can now let your administrator or manager purchase more than one quantity of a Moodle course in a single transaction. If that's not good enough, the extension allows the Instructor or Manager to enroll himself and others to the purchased course!
Screen 1. The Edwiser Bulk
Purchase Extension icon.

So, in short, this extension allows instructors, parents, managers or corporate trainers to purchase a Moodle course on behalf of others, and then enroll them. This extension will save you effort and time. Please note this extension requires the WooCommerce Integration extension to be installed first.

Section 1. Overview

Screen 2. The Big Picture.
Where the Bulk Purchase Extension fits in the E-Commerce system.

How useful is this extension? VERY! Imagine that you are an Administrator who is given the responsibility of purchasing a Moodle course online. You have ten (10) students to enroll into the course that costs USD100 per person. Which would you prefer? To pay USD100 once for every student that you enroll - which means you have to repeat the online payment and enrollment process TEN times? Or to pay USD100 x 10 = USD1,000 once, and enter all ten students' account data, and then have all TEN students' Moodle account created automatically?

Obviously the latter as it saves you time and effort. With Edwiser's Bulk Purchase Extension, you can make a bulk online payment for a course for multiple students. and have those students login into Moodle and start off the course. With the extension this is an almost painless process and a breeze to use.


Tuesday, September 6, 2016

Integrate WooCommerce with Edwiser Bridge to sell your Moodle courses online by using the Edwiser WooCommerce Integration extension

To get POWER, you have to
CONNECT ALL the parts!
So you've got your Moodle site integrated with WordPress using the Edwiser Bridge, and the Edwiser Single Sign On and Selective Synchronization extensions. What's next? How about integrating with WooCommerce?

Edwiser WooCommerce Integration
extension logo

Section I: Overview

The WooCommerce Moodle Integration allows you to sell courses, synchronised by Edwiser Bridge, using WooCommerce. This will leverage on WooCommerce's strengths of e-Commerce functionality and it will allow you to sell multiple courses as bundled products without the need of an additional extension.

This post is Part 4 in the series of Edwiser Bridge and its extensions. Here is the Big Picture that shows where this extension fits in:


Section II: Pre-requisites

This post assume that you have already successfully purchased, installed the WooCommerce Integration extension and activated its license key.

Screen 1. License key information.


Tuesday, August 23, 2016

Edwiser Selective Synchronization extension to selectively synchronize Moodle courses with WordPress

Checklist by Jurgen Appelo.
Licensing: Creative Commons,
Attribution 2.0 Generic (CC BY 2.0)
Source: http://goo.gl/2M0yB7
Welcome the my third post in a series of five posts featuring the Edwiser Bridge and its four extensions. Today I will focus on the Edwiser Selective Synchronization Extension, which is a commercial plugin.
Image 1. SS extension icon.

This plugin works in tandem with the other extensions to achieve a Moodle-WordPress synergy.

Section I. Overview


Image 2. The Big Picture. Where
the Selective Course Synchronizatin extension fits in.

Why is this plugin useful? Imagine a Moodle site with hundreds of courses. With the Edwiser Bridge alone, you would import ALL courses into WordPress. That could be a lot of courses being synchronised, leaving you with no choice but to let the Bridge do everything for you.  You might then end up having to delete the WordPress courses which you don't need. Wouldn't it be far more convenient to be able to choose the courses to be synchronised? You can with this plugin by Edwiser.

Wednesday, August 17, 2016

Edwiser Single Sign On (SSO) extension to access Moodle and WordPress

Two Doors by Stefan W.
Licensing: Creative Commons,
Attribution 2.0 Generic (CC BY 2.0)
http://goo.gl/sVgWXa
This is the second post in a series of five posts featuring the Edwiser Bridge and its four extensions. To re-cap, these WordPress plugins allow you to integrate Moodle with WordPress. In today's post I will focus on the Edwiser Single Sign On Extension which is a commercial plugin.

Image 1. The SSO extension icon.

This extension is an integral component in an e-Commerce system that comprises of Moodle, WordPress and WooCommerce. It works in tandem with the other compnents to create synergy in your system.


Section I. Overview

Image 2. The Big Picture. Where 
the SSO extension fits in.

What is the Single Sign On?
Single sign-on (SSO) is a session and user authentication service that allows a user to use a set of login details - name and password - to access two or more applications, in this case, WordPress and Moodle.

The Single Sign On extension allows you to enter your login credentials once in Wordpress, and to be logged into both WordPress and Moodle at the same time. So with this Edwiser extension, you will be able to, from within WordPress, launch directly into a Moodle site without having to go through the Moodle login page. This extension, used in tandem with Edwiser Bridge and the other three extensions, produce operational synergy for your website.

How to sell your Moodle course with Edwiser, Moodle and WordPress

Source: Alexa_Fotos; Pixabay https://goo.gl/jyiz8N
Some time ago, I wanted to know how I could sell a Moodle course online with a local Malaysian payment gateway. After doing some research online, I discovered that I could do this by using the free Edwiser Bridge and its four commercial extensions (plugins) from Edwiser. Throw in a payment gateway like the iPay88 plugin for WooCommerce, and the world's your oyster.

What is Edwiser Bridge?
Edwiser Bridge is a plugin by Edwiser that integrates Moodle Learning Management System with WordPress. It allows you to import and sell Moodle courses using WordPress. Software requirements of the lugin: WordPress 4.0 or higher.  Compatible up to WordPress 4.5.3.

Today's post is the first in a series of five posts where I will illustrate how I used the Edwiser Bridge plugins and its extensions to create an E-Commerce WordPress website to sell Moodle courses.

Most of the information provided by me on the Edwiser Bridge installation can be obtained from Edwiser's website, specifically the company's Documentation Page. What is different in my blog are detailed screenshots of the installation and test process, and some explanation in my own words.


Learning Outcome
At the end of this post, you will know how to import and synchronise your Moodle courses with WordPress by using the free Edwiser Bridge plugin.

Saturday, February 6, 2016

Book Review: Tornado Down


Hi All

And now for something entirely different. A book review of the 1993 best-seller on Desert Storm. Tornado Down by John Peters and John Nichol.


I just finished the book. Here is my honest review.

The first page of the Book starts out literally with a bang. 280 pages later, it ends with a profound statement about what a hero and bravery is.

The book is well written and is easy to read. You feel as though both authors are speaking to you. Such is the power of reading a book! The authors' descriptive writing makes their whole experience come alive.  All five senses will be engaged. You feel the excitement as the airmen prepare for imminent war. You feel the aircrew's fear of failure when the Tornados refuel in-flight, in pitch darkness. You feel the scorching heat of the desert. You feel the adrenaline rush as the desert floor whizzes past the Tornado that is flying at 500knots, 50 feet above the ground. You taste the fear in the aircrew when they see Triple-AAA greet them as they fly towards and over the Iraqi airfield. You feel the shudder of the aircraft as the SAM hits it. You smell the prison surroundings and feel the dampness of the floors of their eventual prison cells. You winch as the authors describe the brutal blows and torture landed upon them, time and time again. You sniff a tear as you read about their emotional reunions. Such is the power of the descriptive writing style of the authors.

Friday, November 27, 2015

View PDF files in a ShadowBox pop-up window in the Essential Theme on your Moodle 3.0 site (works on all other themes as well!)

Source: Jens Peter Olesen,
Pixabay, CC0 Public Domain
Design. It's all about design. Today's post is  a sequel to my earlier post on the same subject. In that post, I enabled my PDF and ODF files to open in a Lightbox-like window, when clicked upon, in three themes: Evolve-D, Academi and BCU. I had used FancyBox and ViewerJS to achieve this. I couldn't get Fancybox to work with other themes.

The great news is that I have since discovered that ShadowBox (in place of FancyBox) works on Essential and Moodle 3.2's Boost theme. The installation is much easier, and I managed to optimise the look and feel of ShadowBox by tweaking its original CSS file.

Important Disclaimer and warning:
If you find that your Moodle version and Moodle theme causes your PDF file to load v-e-r-y slowly, or if your Google Chrome displays the "Out of memory" or "Aw snap" message,  then try using the FancyBox method that I blogged here instead.

Learning Outcome
At the end of this post, you will be able to hack your beloved and sacred Moodle site so that PDF files will open as pop-ups. That's all. Nothing earth-shattering. However, I strongly believe that my post today is going to touch lives and make a difference in your Moodle experience (XP). As well as your teachers' and students' Moodle XP. Read on!

Saturday, November 14, 2015

How to install the multi-platform PDF pop-up window on your Moodle 2.9.x/3.0 site.

Pop up! Source: Pixabay,
License: CC0 Public Domain;
See https://goo.gl/lAIF8x


Welcome to my Dummies' Guide for the Complete Dummy!

This guide will show you how to enable your Moodle 2.9 site so that if you click on a PDF file resource, a lighbox-like pop-up window will open. I made mention of this 'innovation' here.

A dumbed-down version of this guide is called the Idiot's Guide. But I haven't gotten down to doing it yet because I'm not a complete idiot. Yet.


I crafted this Guide because I am afraid that three months from now I might forget all the steps. Thus the Dummy is I. This guide is insanely populated with screenshots because it is a step-by-step guide for, like I said, Dummies.

A Dummies' Guide should be simple enough for any 'Dummy' to follow. All you need to do is to follow the steps and in the end you will be rewarded. I will hold your hand all the way through.

Learning Outcomes
At the end of this Guide, you will be able to
  • install the PDF pop-up on your Moodle 2.9.x/3.0 site using one of these themes: evolve-D, BCU and Academi. Disclaimer: if you are using a different theme, I cannot guarantee that it work on your theme. I tried to get it to work on Essential, More and Clean themes. I failed. Maybe you can succeed where I failed.
  • to experience the joy of seeing your students open up PDF files as a pop-up window on Moodle, on every platform and device known to man. After this you can sit back, relax and watch Netflix.
  • to see a PDF, Text and ODF (Writer, Presentation, Calc) file open on multiple platforms in the same and consistent way. Check out the Slideshare presentation below. Drool.

Sunday, October 25, 2015

Open and view a PDF file on a Moodle 2.9 coursepage inside a fully-featured pop-up window using Javascript. All without leaving the Moodle coursepage.

By Sean McEntee. Source: https://goo.gl/5vEpBI
Creative Commons License (Attribution 2.0 Generic (CC BY 2.0))

Hi All

1. Introduction


2. The Solution

I managed to make use of existing Javascript libraries to produce a PDF pop-up on my Moodle site. Here's what happens. I drag-and-drop a PDF file into my Moodle 2.9 coursepage. When I click on a PDF resource link, a fully-functioning pop-up window appears.
I've made it work on and for the following: iPad, PC, Android and Mac. I've tested it on IE, Firefox and Chrome. They all work.

Monday, June 22, 2015

Seamlessly connect Moodle 2.9 to Wordpress with Simon Booth's LTI Connector plugin for Wordpress 4.2.2 and 4.2.3

Image by Adina Voicu of Romania.
Source: https://goo.gl/CNpZNx
License: CC0 Public Domain

Update on 4th August 2015
I've converted this  super-long post into a PDF file. You can also go to the bottom of this post for a Scribd embed version of this post.

How would you like to be able to launch into a Wordpress blog directly from within your Moodle production site? At the end of this post, you will know how to enable a Single Sign-On between your Moodle 2.9 site and your Wordpress multisite in a LAMPP environment. To put it simply, within Moodle itself, you will be able to launch into Wordpress directly using the same Moodle login details. For example, here I am at my Moodle 2.9 test page, before clicking on the External Tool activity:


Tuesday, May 19, 2015

How to view Microsoft Documents on your Moodle site the JQuery way (Part 1)

Microsoft Store. That's a nice logo. Source: http://en.wikipedia.org/wiki/Microsoft

Disclaimer: For Microsoft Office files (Word, Excel, PowerPoint) this only works with  files that are available publicly via a public URL. It won't work for Ms Office documents that are added to a Moodle course as a resource.

Ever since I started using Moodle as a file repository for the teachers and lecturers at my work place, I had always wanted to view Microsoft Word, Excel and PowerPoint files easily on my Moodle site. The easier and faster, the better. You know the story.


Figure 1. Many thanks to Davo Smith and others for
the time-saving drag-and-drop feature of Moodle!


Figure 2. What the file looks, sitting pretty on your Moodle coursepage.


Figure 3. Click on the Ms Word file, and Google
Chrome instantly downloads it. So this means I need to run Microsoft Office to view the file's contents.
Fine and good. Everyone does this. But what if I just wanted to view the file without any fuss?

Figure 4. Using Internet Explorer to access and download the Moodle file resource
invokes a Window prompt like this. Clicking on "Open" gives you...
Figure 5. ..this! You will need at least another two
mouse-clicks before you get to view the file.

So after uploading a Word file to your course page by dragging and dropping, each time you click on the file, depending on which browser you use, the file either gets downloaded instantly or you are prompted to either open the file or download the file. Why can't I just view the file there and then without having to invoke Microsoft Office ?

Wednesday, May 6, 2015

Embed a PDF file (and more!) in your Moodle course page by using ViewerJS. Cool!

Source: https://www.flickr.com/photos/degu_andre/5364417987/
André Gustavo Stumpf, some rights reserved.
If you ever wanted to embed PDF files inside your Moodle 2.x course page, but didn't know how to, look no further than the uber easy-to-use ViewerJS.

At the end of today's post, you will be able to view PDF files and Ms Office files direct off your Moodle course page. How? Read on!

1. Download the Javascript zip file from here.
2. Unpack the file on your computer. You will see a folder named 'ViewerJS'.
3. Upload (FTP) that folder to your webserver, preferably to www.domainname.com/moodle/ViewerJS
3. Upload one or more PDF documents to your webserver, preferably to a custome folder named pdfs. E.g, at the location www.domainname.com/moodle/pdfs
4. Create a Label resource with the example HTML code below


The softcopy code is given here:

Tuesday, May 5, 2015

Enable the Lightbox effect for an image file inside a Folder resource on your Moodle site

Folders by Colleen  Galvin, on Flickr
Source; https://www.flickr.com/photos/col233/7974661195

I am having fun implementing the Lightbox javascript effects on images on my Moodle site. It was just yesterday that I realised that I could upload image files into a Moodle folder resource, but when I clicked on an image file, the file downloaded instead of loading up on-screen. It was then that I decided to see if I could make a clicked file link open up on-screen with the Lightbox effect. I am happy to say that I have succeeded to do so, albeit with a hack or two.

Here is my Moodle folder resource.

Figure 1. A normal-looking folder containing 2 image files, 1 text file and 1 Ms Word file.
Nothing out of the ordinary here....

Figure 2. What happens when the file itec2015-1.png is clicked.
Whoa! It's a lightbox image effect. Click the 'x' to close.

Enable the Lightbox effect for an image hyperlink in a Label resource on your Moodle site


Photo credit: Lightbox-1 via photopin (license)

L
ightbox is a JavaScript library that displays images and videos by filling the screen, and dimming out the rest of the web page. The original JavaScript library was written by Lokesh Dhakar. The term Lightbox may also refer to other similar JavaScript libraries. Text is from: Lightbox (JavaScript) - Wikipedia, the free encyclopedia

In this post, I will show you how you can enable Lightbox for an image hyperlink in a Label resource on your Moodle site. The genesis of this post was the Blog Learning Rocks. Dan Roddy has written an average of one blog post a year for the last two years, and seven posts a year for the last six years. Which is not much, but this 2010 post of his has become my inspiration for today's post. In fact, thanks to Dan's post, I've also managed to enable the Lightbox effect on image files inside a Moodle folder resource! More on that later in another post on Moodurian.

Well, let's get started shall we?
Step 1: Surf to Dynamic Drive's Lightbox image viewer page.
Step 2: Download the file lightbox.zip
Step 3: Extract the contents of the lightbox.zip to your hard drive. You will see the folder named "lightbox" and its contents below:

Figure 1. Contents of lightbox.zip

Friday, May 1, 2015

A minimalist design approach to the Restricted Access resource as displayed on a Moodle course page.


Source: http://upload.wikimedia.org/wikipedia/commons/0/07/Taiwanese_Monk_at_the_Salar_of_Uyuni,_Bolivia.jpg
Note the clean whitespace around the monk? Very minimalistic, Zen-like and serene if you ask me.


Below is a file resource that has its Restrict Access settings set. It is grayed-out so that the user knows it is a conditional resource, and the critieria for its access is clear to all.
The displayed text "Not available unless: Your category is hq" means that the user cannot access (read) the resource unless his Custom Profile has been set to "hq". It serves a vital purpose and is useful when a student needs to be informed that a criteria needs to be met or score needs to be attained before he or she is allowed to access that resource.

In my humble opinion, I find the conditional text as intrusive to design of the course page. It does stick out and the eye cannot avoid it. I also think that sometimes the conditional text is redundant and would be better if it were not visible. For example, in the business context, some files may be made inaccessible to a user because the user is unconfirmed. He or she is still on probation. Hence, the Moodle administrator may want the staff to not click and access the resource, but only see the resource as being there on the course page.

The purpose of this post is to show you how to remove the conditional text. At the end of this post, your home will look like this:


Looks like that famous photo of Steve Jobs in his home with minimalistic furniture.
Photo by Benjamin Stockwell. Source: https://www.flickr.com/photos/kingbenny/5186217964/
License is Creative Commons Attribution, non-commercial use.

Okay, now seriously,  At the end of this post, your screens will looks like this:

Ratings and Recommendations by outbrain