So what exactly is Noodle?
"Noodle is a module, downloadable by your Moodle administrator, All which makes it very easy to add NLN Learning Objects to Moodle course pages. By making a streamlined version of this Web site available from within Moodle Itself, it makes adding Learning Objects to a course page as Word documents Easier than adding."
(http://www.moodlefacts.nl/2011/09/19/noodle-in-moodle/)
Figure 1: Noodle at work in Moodle.
So what exactly are the NLN materials?
The NLN Materials are small, flexible 'bite-sized' learning objects. They are designed to support other main topic areas. "The materials adopt a range of approaches involving some knowledge acquisition, a chance to practice and absorb, and some form of assessment to check that the learning has been understood and the learning outcome(s) achieved" (from Xtensis Ltd's website).
Funded by the Learning and Skills Council (LSC), the NLN materials represent one of the most substantial and wide-ranging collections of e-learning materials in the UK.
Figure 2: The main menu of the NLN materials as shown inside the N:N browser.
ACL stands for Adult Community Learning.
ACL stands for Adult Community Learning.
Figure 3: The areas of learning.
Hmm...I wonder what happens if I were to click on "Office Administration" L1...?
Figure 4: Individual learning object units. I am now pointing to
"Office ergonomics - reception desk"
"Office ergonomics - reception desk"
Figure 5: Drilled down all the way to the specific Learning Object.
I have installed the Moodle plugin and after combining it with the Accordion resource, here is the result on my Moodle site. To test drive the NLN resources on my Moodle site, go to:
http://scm.moodleace.com/course/view.php?id=19
Username: student
Password: moodle
Figure 6: The first three ESOL levels' learning objects encapsulated in an Accordion resource.
Why did I choose to display the ESOL learning Objects in this manner? Simple! To avoid the Scroll-Of-Death.
Figure 7: The second ESOL levels learning objects unveiled.
I case you're wondering where that orange icon came from, I designed it. Here it is below (in orange).
Figure 8: What happens after you click on a Learning Object - it loads up!
Figure 9:An example of a Learning Object inside Moodle.
Notice the page links on the upper right-hand corner of the screenshot?
Notice the page links on the upper right-hand corner of the screenshot?
Some history about the NLN, again from Xtensis Ltd's website:
"Xtensis Ltd. was involved with the NLN project from the beginning, acting as a consultant company and providing SCORM-compliance testing of the learning materials. The British Educational Communications and Technology Agency (BECTA) commissioned Xtensis Ltd. to provide an Educational Content Management System.
...
The Xtensis system supplied to BECTA provided the framework for one of the largest production of Learning Objects ever undertaken in the UK.
Later in 2007, Janet and the LSC launched a tender process for a unified delivery service for the NLN Materials, combining the facilities of the three existing distribution sites. Xtensis won the contract, and, on a swift delivery schedule, launched the new site at nln.ac.uk in October 2007.
The new site included all the facilities included in the widely-acclaimed Adult and Community Learning (ACL) site, but in a more dynamic and unified manner, opening access to all sectors, and with a dedicated support channel and help-line. On 10th April 2008, the service reached 10,000 registered users".
HOW TO INSTALL AND USE NDL MOODLE PLUGIN
Step1: Download the plugin
- Surf to http://www.nln.ac.uk/?p=Noodle
- You will see the link "Download Noodle 1.1" (heh, you can download it directly from here!)
- Extract the noodle11.zip file and you should see this folder in the download area of your computer:
Figure 10: The contents of the Noodle11 folder.
- Rename the folder noodle11 to nln.
Figure 11: The nln folder after being FTP'd to the server.
- Use an FTP client program (I use FileZilla), copy the folder to yourmoodlefolder/mod/resource/type
- Turn "Editing on"
- Click on "Add a resource" and choose "NLN Learning Object"
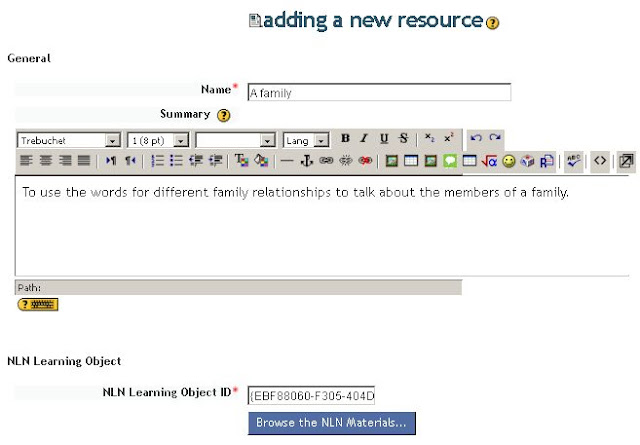
- The following dialogue box will appear:
Figure 13: The Resource dialogue window
Step 4: Add the THREE parameters - Name, Summary and NLN Learning Object ID
- See the "Browse the NLN Materials..." button? Click on it! Your web browser will now be connecting to the NLN repository via the NLN Materials browser.
Figure 14: Be patient...
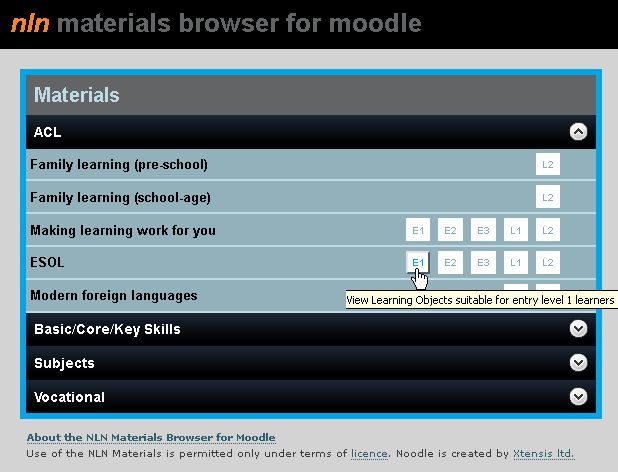
- The connection process should only take a couple of seconds. You should then see a detailed menu which collapses into this main menu:
Figure 15: The Materials browser main menu
- Click on one of the areas, for example ACL (which stands for Adult Community Learning). You will see a more detailed submenu appear. This is the NLN Browser at work. Kind of cool eh?

Figure 16: The expanded Materials browser main menu shows
the categories of Learning Objects (shown here as white square buttons)
the categories of Learning Objects (shown here as white square buttons)
- Click on the button "E1" and the E1 submenu will appear. What a wealth of materials appears!
Figure 17: Finally - you can now see the individual Learning Objects
- Click on, let's say, "A family" topic.You will see the "A family" information window appear.
Figure 17: Information about a Learning Object
- Click on the "Add to Moodle course" button. The title, description and the id of the Learning Object will automatically fill up the Name, Summary and NLN Learning Object ID fields in the Moodle dialogue box shown earlier!
 Figure 18: The Resource dialogue box with the THREE data automatically inserted.
- This method of using the NLN browser for every Learning Object was quite torturous for me as my Internet lines was quite slow! I found that a better way to get these values was to open the Learning Object window and then copy-and-paste the sections highlighted in hot pink! This procedure of proved faster for me.

Figure 19: Information (shown in pink) about a Learning Object that can be
copied-and-pasted into the Resource dialogue box.
copied-and-pasted into the Resource dialogue box.
- Now to do all this donkey-work to add all ESOL Learning Objects to
my Moodle site requires a Moodle donkey to sit at the keyboard for a
couple of hours. I was my own Moodle Donkey! I painstakingly added all
the Learning Objects for ESOL E1, E2 and E3. That was quite a lot of
work, but I enjoyed it and considered it as a labour of love.
- Coming back to Figure 13, I discovered (and so have other users on Moodle.org) that if you leave the resource to "Open in the Same Window", the SCORM Learning Object WILL SIMPLY REFUSE TO DISPLAY!
Important: the solution to this 'bug' (?) is to change the Window option to open in a "New Window". The resultant window works best for me when I resize the width and height to 1024 x 768 pixels.
Figure 20: Window data to activate the Learning Object in your Moodle site.
Remember to open the resource as a NEW WINDOW!
Remember to open the resource as a NEW WINDOW!
- Click the "Save and return to course button". A new resource will be created, with the generic resource icon. I feel that it would be better if a unique icon were to be used for this NLN Learning Object resource!
- Clicking on the resource reveals the Learning Object window in its full glory:
Figure 21: The Learning Object loading. Hope your Internet line is fast as this will happen with every
Learning Object that you access from your Moodle site!
Learning Object that you access from your Moodle site!
Figure 22: At last - the Learning Object!
Hope you found this useful. Now all you need is to fly at the speed of light to reverse the rotation of the earth and thus reverse time. Then you can spend a few hours to add the NLN Learning Objects to your Moodle site and not lose any time at all!
That's ALL folks.
See you later Alligator!
Frankie Kam
Melaka, Malaysia


No comments:
Post a Comment